Before getting the DiskStation 420+ some years back, I never knew a network-assisted storage device would be an essential part of my daily life. From playing movies on the Smart TV in the living room to backing up my computer, a NAS device makes it easier to manage one’s digital life. I upgraded to DiskStation DS920+ last year and gave it some major upgrades – an additional DDR4 RAM chip plus two NVMe SSD drives for cache acceleration.
So, how good – or bad – is the DS920+? Does the small gap in price between the DS920+ and the DS420+ make any difference? This review takes a look at this and more.
Technical Specifications
Before proceeding, let’s see how the DS920+ compares with the DS420+ in terms of technical specifications.
| Central Processing Unit | Intel Celeron J4125 4-core 2.0 (base) / 2.7 (burst) GHz | Intel Celeron J4025 2-core 2.0 GHz, burst up to 2.9 GHz |
| Hardware Encryption Engine | Yes (AES-NI) | Yes (AES-NI) |
| Random Access Memory | 4 GB DDR4 non-ECC (expandable up to 8GB) | 2 GB DDR4 onboard (expandable up to 6 GB) |
| HDD / SSD Compatibility |
|
|
| Hot-swappable drive | Yes | Yes |
| Drive Bays | 4 | 4 |
| Maximum Drive Bays with Expansion Unit | 9 (DX517 x 1) | N/A |
| M.2 Drive Slots (cache) | 2 x NVMe | 2 x NVMe |
| Available Ports |
|
|
| File System | Internal Drives Btrfs, EXT4 External Drives Btrfs, EXT4, EXT3, FAT, NTFS, HFS+, exFAT |
Internal Drives Btrfs, EXT4 External Drives Btrfs, EXT4, EXT3, FAT, NTFS, HFS+, exFAT |
| Physical Appearance | Mass 2.18 kg Dimensions (H x W xD) 166 mm x 199 mm x 223 mm |
Mass 2.18 kg Dimensions (H x W xD) 166 mm x 199 mm x 223 mm |
Although these two NAS devices look similar physically, the major differences lie in the RAM and processor configurations. Apparently, the DiskStation DS920+ is the better of the two, thanks to its bigger random access memory and a faster processor with two extra cores. It also supports the DX517 5-bay expansion unit in case you plan to use as many as nine disks. Whether you’re a power user who needs a capable NAS device or you run a small business that needs this for storage and collaboration, Synology DiskStation DS920+ has enough power to live up to your demands.
Unboxing
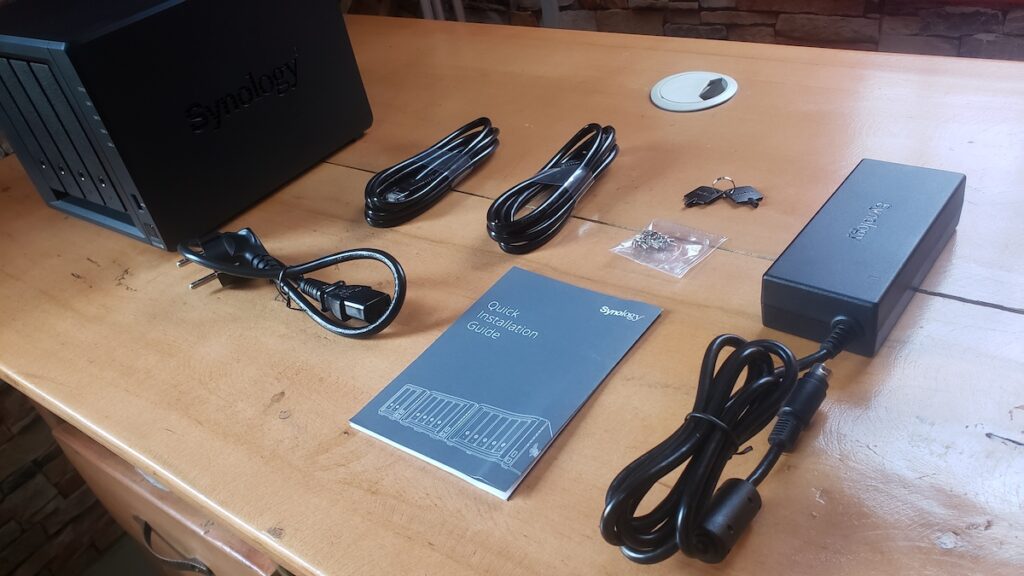
If you got this brand new, these are the items to expect in the box apart from the DS920+ unit:
- Accessory Pack X 1
- AC Power Adapter X 1
- AC Power Cord X 1
- RJ-45 LAN Cable X 2
- Quick Installation Guide X 1
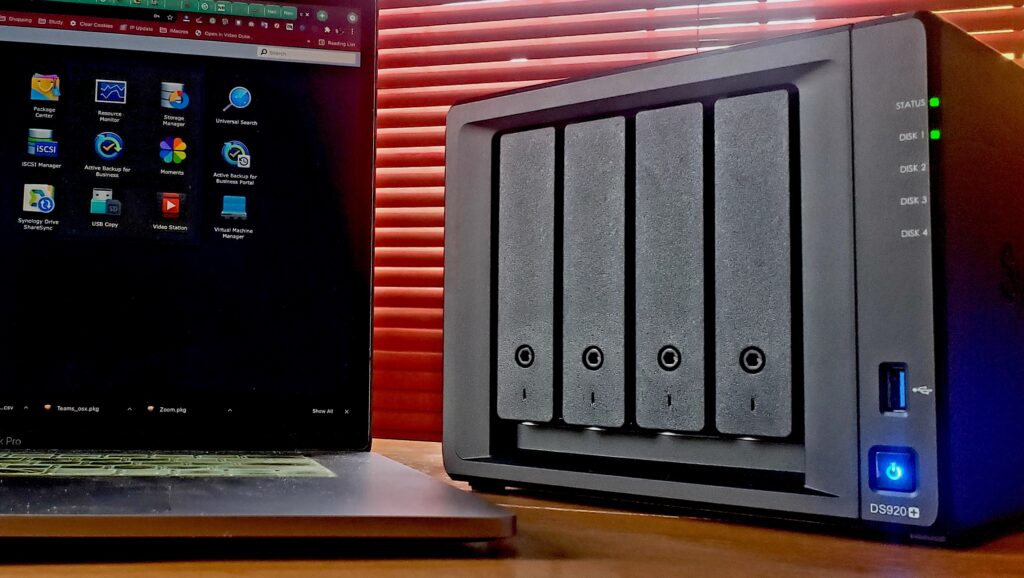
Just like the DS420+, the DiskStation 920+ has four bays located at the front. On the right are the power button and a USB-3 port. There are also indicator lights that give useful information about the status of the device and each bay. Weighing only 2.25kg without any disk inserted, the dimension measures 8.73 x 7.83 x 6.54 inches.
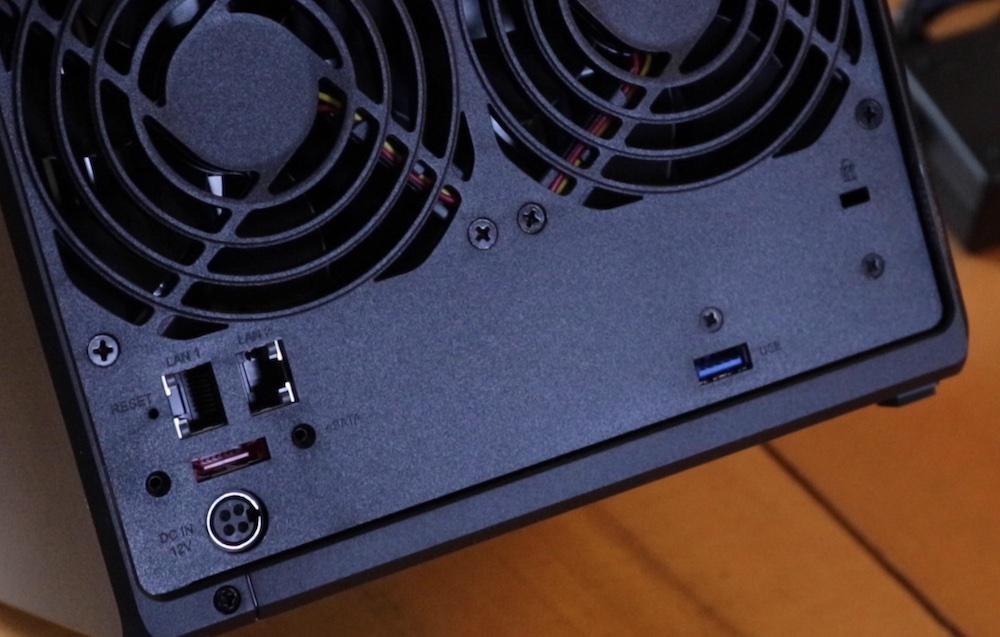
At the back are two 1Gbe LAN ports, the power adapter interface, and an eSATA port. Also, there is a second USB 3.2 port. At the bottom, there are two NVMe SSD slots designed for cache acceleration.
Setup
Like all Synology NAS devices, setting up the DS920+ is quite a walk in the park. Even if you’ve never set up one before, the user manual gives clear and easy-to-follow directions on how to get started. At the moment, I’m using 2TB 2.5″ hard drives on two bays, but I plan to expand these later. Whether you’re using 2.5″ or 3.5″ disks, the screws needed to fix them are already provided.
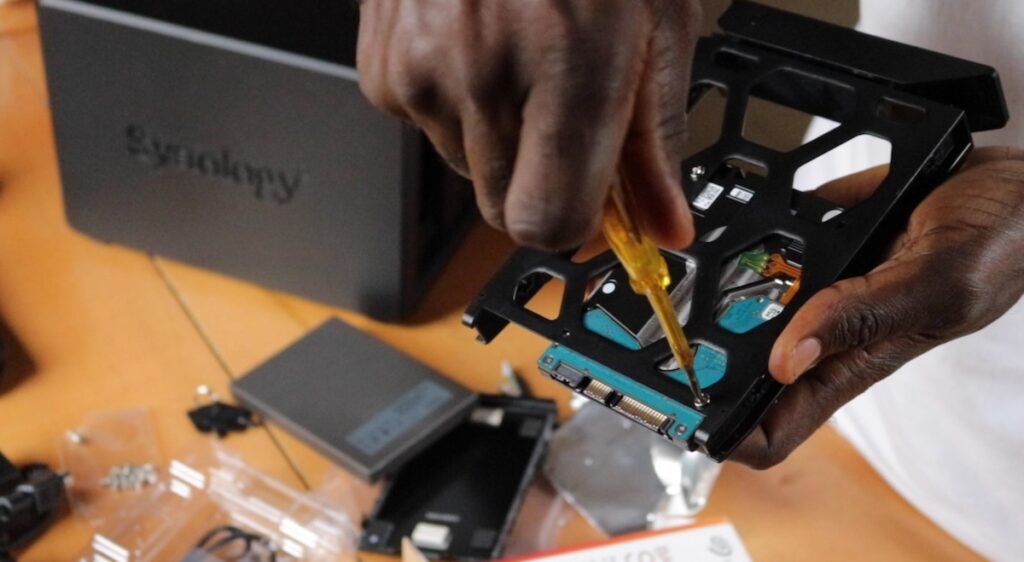
There is a long list of supported drives on the official website, and it’s always a good idea to check this out before making a purchase. However, the disks I’m using on this unit are not on this list and they work just fine. Just because your drive isn’t on this list doesn’t mean it’s not going to work. As long as it’s a 2.5″ or 3.5″ disk, it’s very likely going to be compatible.
You have the choice to set up the NAS device on a desktop or a mobile, but it’s preferable doing this on a desktop from experience.
- Connect your computer and your powered DS420+ to the same LAN.
- To make it easier, download and install Synology Assistant or simply go to find.synology.com on a browser.
- Once the device is detected, proceed with the setup by following the screen prompts.
- If the unit doesn’t ship with the latest version of DSM, you may need to update it before proceeding with the setup.
Synology’s custom Hybrid RAID
Before the DS920+ is ready to use, you need to create a volume and select your preferred RAID setup. If you are not familiar with how RAID systems work and which exact one to go for, it is advised that you simply select “Quick” mode on the volume creation interface. This option lets you use recommended settings and saves you the trouble of finding the perfect settings or messing things up.

The Quick mode enables Synology Hybrid RAID on your volume which is quite different from classic RAID systems. With this, even if your drives are not of equal volumes, your disk space is never wasted. Also, SHR is optimized in terms of space allocation, speed, and performance to take full advantage of Synology NAS devices.
Even if you are a home user, it is recommended to use two or more bays to ensure fault tolerance and data protection are active. This is automatically enabled with an SHR setup.
However, if you are an advanced user with specific needs, the custom setup lets you determine exactly how you want your RAID setup to look. For instance, if you’re using this for business and Synology High Availability (SHA) is a necessity, SHR does not offer this and you need to look into other options.
Working with DSM and installing packages
DiskStation Manager is an intuitive operation that is easy to navigate as long as you know how to operate Windows or macOS. Depending on how you plan to use the NAS device and what your intentions are, you need to install certain packages from the store. Thankfully, most of these are free. As a matter of fact, you may not need to spend a dollar to purchase applications unless your business specifically needs certain features.
The most important packages like Synology Drive Server, File Station, Synology Photos, Active Backup for Business, Surveillance Station, and more are free. For developers too, PHP, WordPress, Apache HTTP Server, Node.js, Python, and the rest are provided for free by third parties.
Thankfully, there are several mobile applications designed by Synology on the App Store and the Play Store to access your NAS. Synology Photos, Synology Drive, DS File, DS Audio, and others are all mobile applications that let you manage your device on the go.
I’ve been using the DS920+ basically for file backup and management, virtualization, and multimedia. Thanks to the DS920+, I no longer fully rely on Google Photos since the free unlimited storage option already ended last year. Synology Drive also helps me back up important folders on my home computers as well.
Whether you intend to use the NAS device as a media server through applications like Plex, you’re running a business that requires critical backups and an email server, or you intend to host a PHP website on this machine, there is a package available for almost every need.
Performance
Synology DiskStation DS920+ comes with an Intel Celeron J4125 quad-core processor. The base speed is capped at 2.0GHz, while the burst speed goes up to 2.7GHz. Compared to the DS4240+ which has a dual-core Intel Celeron J4025, the DS920+ is a lot more powerful with its 4GB RAM configuration. This can be increased to 8GB if needed.
Even without extra buffs, the DS920+ is a powerhouse. To operate the NAS device at maximum capacity, I already got an extra 4GB of RAM and two 400GB M.2 2280 VVMe SSD for cache acceleration. Are these absolutely needed? There isn’t a straight answer as this depends on what you need to do with the device. If you’re a regular home user, there isn’t a need to add extra RAM or enable cache acceleration. However, if you’re using this for business or you are a developer that needs to use this to power a website or run virtual machines, these enhancements are worth it. By default, though, the DS920+ is no slouch.
From my personal experience, buffing the specifications does not directly affect file transfer performance over LAN. This is usually determined by the speed of your LAN connection. With the two 1GBe ports engaged, the write speed hovers around 220MB/s, while the read speed is slightly lower. In a real-life scenario with only one 1GBe port in use, the write speed should be a bit above 100MB/s.
Even though you are accessing the operating just through a web browser, the experience is quite smooth. Applications respond fast to input and I hardly notice any form of lag.
Verdict
In terms of the technical specifications and raw power, the DS920+ might look like an overkill if you’re just a regular home user, but there’s absolutely nothing wrong in investing in ‘future-proof’ devices. Again, the price difference between these units is rather small considering how much difference a 4GB RAM and a quad-core processor can make compared to a 2GB RAM and a dual-core processor.
For power home users, developers, and businesses, the DS920+ strikes a balance between price, performance, features, and functionality. It is one of the most enticing offerings Synology has in the mid-range product line.


